Resources Hub
Production Tips & Advice
Taking the first steps to producing your book can seem daunting but that is exactly what our team of specialists are here to help you with.
Focused Guidance
Typesetting your manuscript
The manuscript is finished but what comes next? You want your book to be beautiful both inside and out to ensure that the reader never puts it down. If you were to look at two different books on your bookshelf you will notice that the inside text design is completely different; this is where a typesetter comes in. How do you decide on the format, the font, the type size, the layout? What is it that makes your book a pleasure to read?
Cover design
It is often said that you shouldn’t judge a book by its cover, but your readers may do so. You want your book to target the right readers, you want it to be picked up by the right hands and therefore your cover, to a certain extent, needs to reflect your words.
You want your book to stand out but what you don’t want is a chick-lit style cover on a sci-fi novel. Having professional input on the cover design of your book will ensure that it is designed in such a way that makes it stand out within the right genre and for the right reasons. We can put you in touch with cover designers who can give you first-hand advice on the right cover design for you.
Trim size
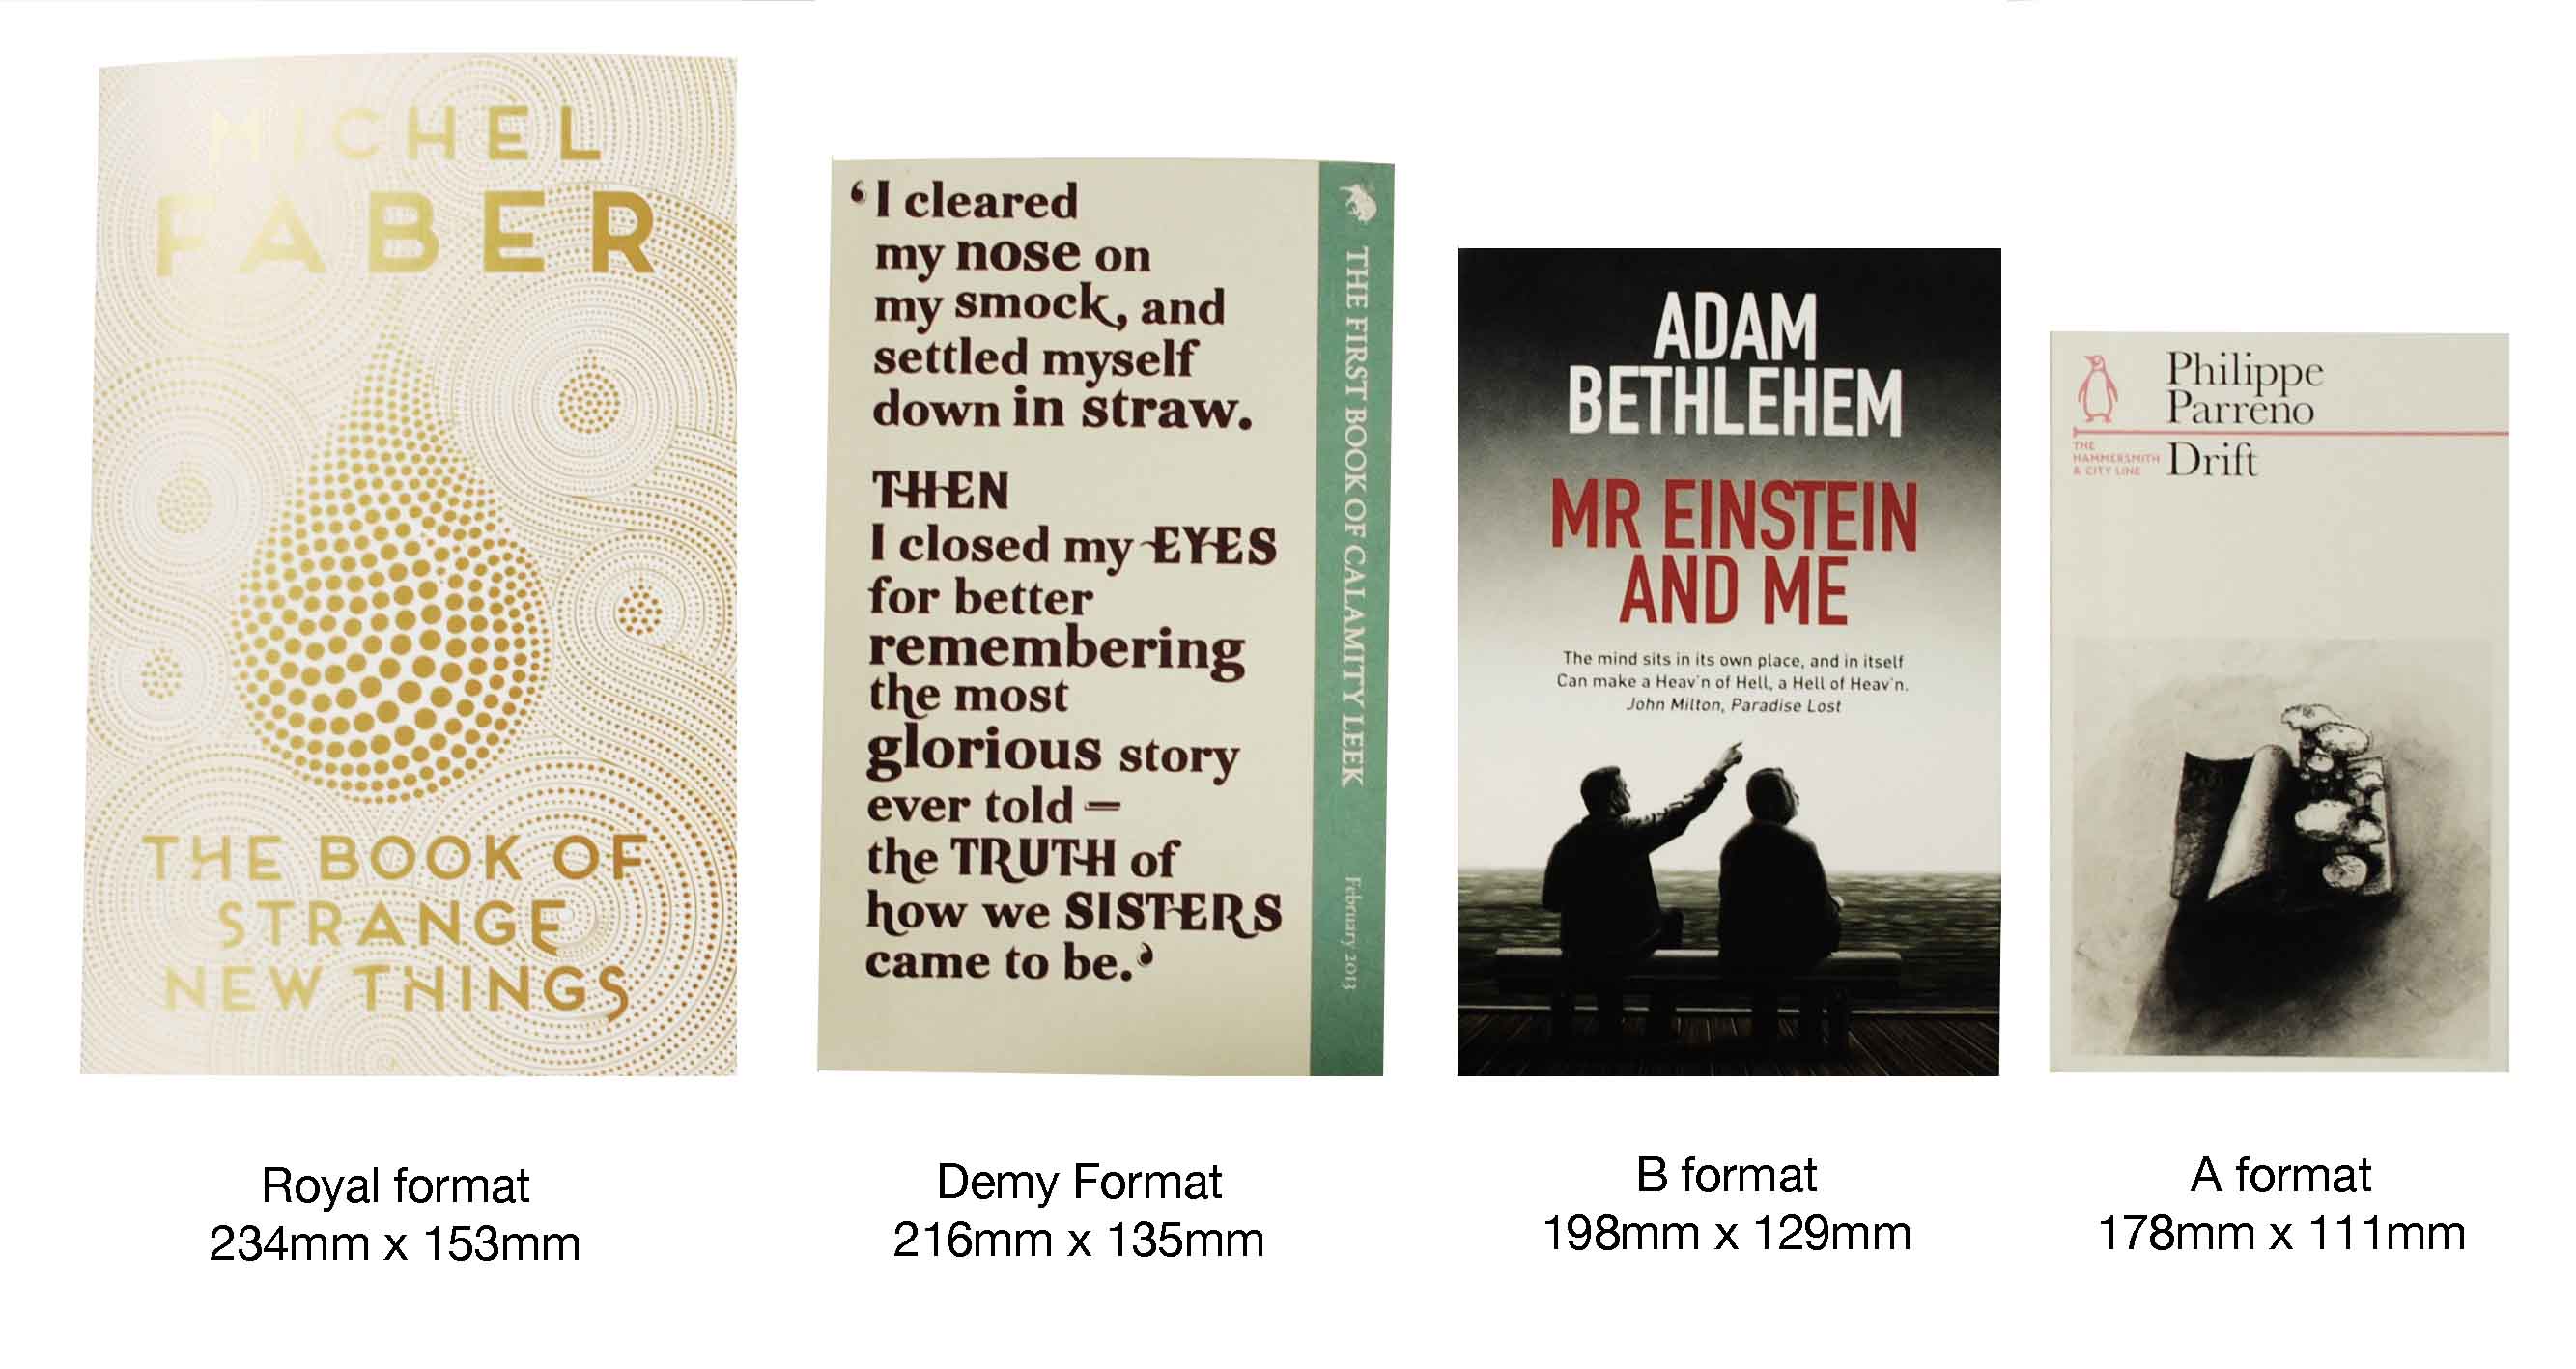
Trim sizes refer to the format of the finished book after it has been bound. Although we don’t want to drive the decisions that you make, we will give you guidance as to how to make commercial decisions about the design and format of your book.
The most widely used of these formats is the B format paperback and is probably what your own bookshelf is full of. The format that you chose is closely linked to the retail price that you want to charge. For example, customers may be willing to spend more on a B format book than an A format book, and a Royal format book than a B format book.
- A Format: 178mm x 111mm
- B Format: 198mm x 129mm
- Demy: 216mm x 135mm
- Royal: 234mm x 153mm
Extent
Text papers
Calculating spine width
Printing
Binding
Cover Finishes
Varnish
Varnish is a cost effective finish which offers overall protection and coating to the printed cover. It is clear and provides a gloss or matt finish.
Gloss Varnish – Gloss varnish is a lacquer that we can use to coat the cover. It protects against general wear and tear and gives a high gloss finish to your cover.
Matt Varnish – Matt varnish is the same process as gloss varnish but instead of being shiny, it provides a more subtle matt finish.
Lamination
Gloss Laminate – It is very high impact and hard wearing. It makes colours more vibrant and offers a high level of protection to books.
Matt Laminate – It gives a subtle and tactile finish to your cover. It doesn’t provide the same level of protection as gloss lamination but it is a more popular choice due to its smooth quality finish.
Soft Matt Laminate – Similar to matt laminate it has a premium feel and is extremely tactile, like rubber to touch.
Other Cover Finishes
Spot UV – this is where we apply gloss varnish to a localised and specific area of your cover, for example, the title or an image. It is particularly effective when used against a matt laminate cover finish due to the contrast of matt and high gloss.
Foil blocking – this is the process of applying a metallic foil to your cover and available in a range of colours. The process of foil blocking is done on a foil blocking machine where heat is used to stamp the foil onto the surface of the cover via a brass block.
Embossing – Pressure is applied to the cover board using a die to distort the surface and raise a specific area for greater emphasis or to create a textured effect.
De-bossing – De-bossing follows the same process as embossing but rather than raising an area it creates a hollow or dip.
All of these cover finishes do incur additional costs. The cost of making a block for foiling and/or embossing is quite high, so for runs of under 1000 copies we would suggest sticking to standard cover finishes such as varnish or laminate.
All of these cover finishes can be applied to both paperback and hardback jacketed books. There are additional choices that you can make about cover finishes if you decide to print a hardback book.
Hardbacks
Cases can be covered with a wide range of materials but the following are the most commonly used and the most cost effective.
- Printed paper
- Paper embossed to look like cloth (Wibalin)
- PVC coated paper (Balacron/Baladec)
- Real cloth
Supplying files for print
Text PDF’s
Before submitting your files for print, you can go through the following check list.
- You may have previously printed your book with an online printing company as a POD title. It is a legal requirement to have the current printers details on the imprint page of your book. Please insert the details below:
Printed and bound in Great Britain by Clays Ltd, Elcograf S.p.A
- Save as a PDF document
- Ensure that any blank pages are meant to be blank
- Make sure pages are in consecutive order
- Embed all of the fonts
- Provide pages how they should appear visually, for example, if portrait, the PDF should be portrait
- Always save as single page spreads
- Ensure that your PDF is set to the correct trim size, with the correct margins and crop marks
- The text must be a minimum of 6mm away from the crop marks, if not then you risk trimming the text off of the page
- When saving your file, title your file with a logical file name for example, if the title of your book was ‘Great Expectations’, your text files should be saved as: TextGreatExpectations.pdf
Cover PDF’s
The cover for your book also needs to be submitted as a PDF file. We print in CMYK -Cyan, Magenta, Yellow and Black- so when submitting your cover file please be sure that it is set to a CMYK colour profile. If you have your colours set to RGB -Red, Green, Blue- then the colours will look different when we then print it in CMYK.
If, for example, you submit a file that has your logo set to RGB and a background image set to CMYK, when we convert the whole file to CMYK, the colours in the logo will look different. We do perform pre-press checks on your submitted files however it is your or your designers responsibility to ensure that the cover is set to the correct colour settings when we receive it.
You can either check with your designer or check the document settings on the software that you have used. Before submitting your files for print, you can go through the following check list.
- Ensure that it is the correct trim size – for example, if it is a B format it should measure 198mm x 129mm
- Ensure that the spine width is the correct width using our online spine width calculator
- Make sure that the colour profile is CMYK and not RGB
- If there is anything that should run to the very edge of the cover whether it is colour, text or image, the you need to include a 3mm bleed.
- Make sure that any type or non-bleeding images such as your logo are withdrawn at least 4mm away from the book trim edge.
- Make sure that the file has trim and spine width marks
- Make sure that the images within the cover file are high resolution – a minimum of 300dpi
- When saving your file, title your file with a logical file name for example, if the title of your book was ‘Great Expectations’, your cover files should be saved as: CoverGreatExpectations.pdf. If you have an additional cover finish you should save it as a separate PDF file, for example, GreatExpectations-spotuv.pdf
Bleeds
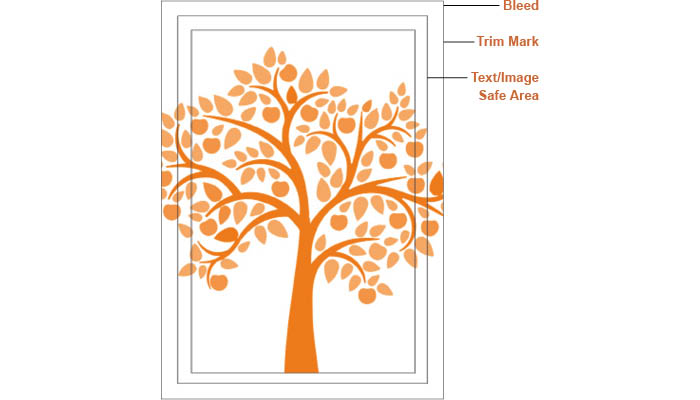
Looking at the design of your front cover, if you have an image that runs to the edge of the cover, then you will need to add a bleed. Where images run to the trim, an allowance needs to be made to account for the tolerances in printing. The image should continue for 3mm outside the trim area to ensure that the image covers the whole of the print area and so that there is no risk of the image not covering the whole area once trimmed.
If you don’t want images on the front cover to run over the edge, then you need to ensure that there is at least 4mm between the image or text and the edge of your cover. This is so that when we trim them down the image doesn’t sit so close to the edge that we risk trimming it off.
Bleed
The area outside the trim mark is called the bleed. As previously explained, if you want an image to print to the edge, then the image needs to bleed 3mm outside of the trim mark to account for print tolerances.
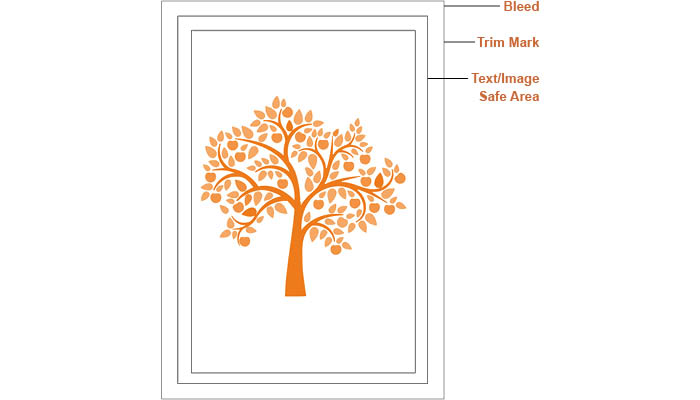
No Bleed
The text/image safe area (4mm away from the edge) is the space in which the main body of the text or of an image sit without the risk of being cut off or loosing a section of the image that was intended to be printed.
Final steps
Estimates
Once you have a final specification and know the size of your print run, we will provide you with an estimate. The estimate will contain all of the information about your book specification so that you know exactly what we are estimating for, accompanied by the cost of printing the number of units that you wish to print. Our estimate will include delivery to one UK address.
Run-on pricing
In addition to quoting for the quantity requested we also show a run on price. You may pro-rata this figure to calculate alternative order quantities. For example, if we quote for 500 copies with a 100 run on, the cost of producing 750 copies would be the 500 copy price added to 2.5 x the 100 run on price. The run on price should not be confused with a reprint price.
Purchase Order
Once you are ready to print your book you will need to raise a purchase order form with Clays. You will need to fill out the form with all of the specifications and a delivery date. At this stage it is essential that all of the details that you input into the purchase order form are correct. The purchase order form is available in both print and electronic format via our website with details on where to send it.
Payment and Invoicing
We operate on a cash-with-order basis and the books will be printed and distributed once we have received payment. An invoice will be raised once all books have been dispatched acknowledging any previous payment. Please follow the link for payment details.
When Can I Expect Delivery?
Once the purchase order has been processed, the payment has been received, and the data has been through all the pre-press checks for print, your books will be printed and it will take 10-15 working days for your books to reach you, depending on your delivery location.
Delivery Considerations
Depending on where you want the books to be delivered, the order quantity and the type of packaging you have opted for, whether it be in cartons or on a pallet, will depend on what delivery method is right for you.
We can deliver on pallets to your front door, but if you are distributing them yourself, it is more manageable to have them delivered in more manageable binders parcels. If you do opt to have them delivered on a pallet then you need to consider road access and how your delivery will be lifted from the vehicle, alongside where you are going to physically store them. We can deliver to multiple addresses but you will need to let us know so that we can process this within the estimate.
Ready to print?
Now that you have read through this information, we hope that you feel more informed about printing your book. We pride ourselves on our customer service and so even though we have created this guide to give you a better understanding, we understand that it still may not be clear, so please don’t hesitate to contact us. Whether you have a one off question, you need some advice, or you would like a price for printing, we look forward to hearing from you.
If you would like to discuss your project with a member of the team, please visit our contact us page.